|
Tittri
\ (◡) /

|
|

02-21-2007, 06:35 PM
I wrote this tutorial up a while ago. Please excuse me if it's just a tad bit confusing. Feel free to ask questions at the end of the tutorial :D
This is a tutorial in how to do an oekaki in solids, using Paint BBS v. 2.20
This is what you should keep in mind when you get started with your oekaki:
* A basic idea of the picture in mind. Although this isn't a must, it'll make the process much easier.
* A set of references, if needed, is handy
* A rough estimate of the space you need. Some oekaki boards allow you to change the canvas size after you've started the oekaki. However, it may cause technical difficulties if you do try to change the canvas size and lose whatever you had on the canvas so far.
Let's get started!
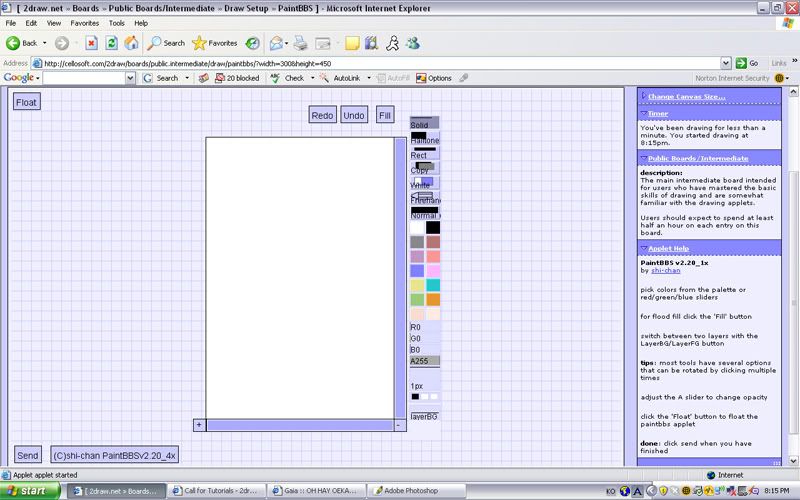
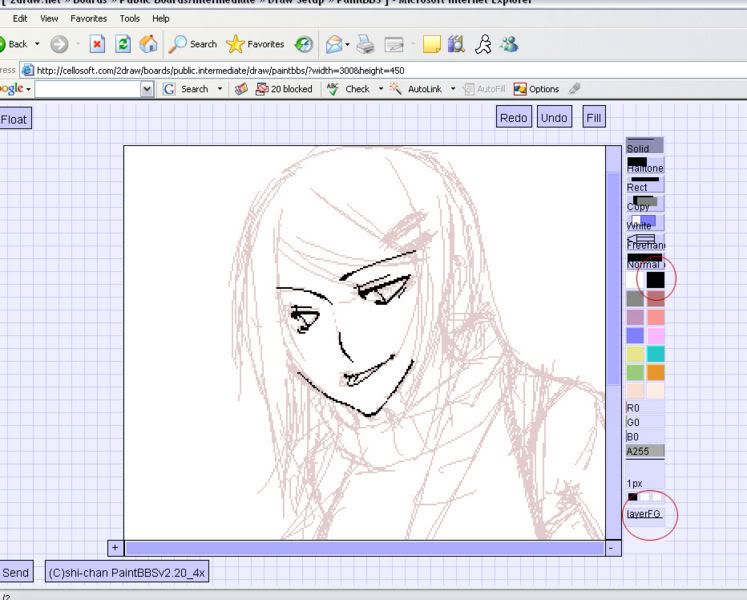
This is what it should look like when you open up the program
|
|
|
|
|
Tittri
\ (◡) /
|
|
02-21-2007, 06:38 PM
Starting Out
Click on the first button on the toolbar to the right of the screen. This chooses the 'solid' tool. Click on a color from the color bar to choose the color your sketch will be in. Make sure the size says 1 px and sketch away. If you mess up, you can click on the 'white' tool on the tool bar. This acts as an eraser in paint BBS.
**Do a rough sketch of your oekaki with the solid tool. You can choose any color to do so : )
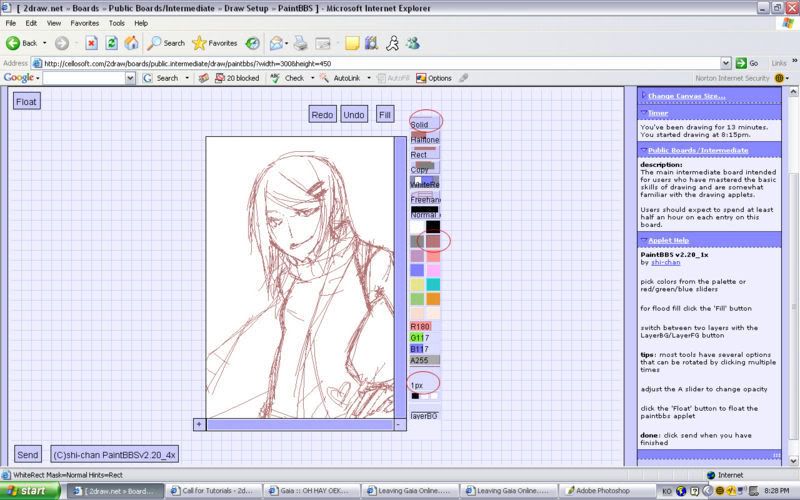
Once you are satisfied with your sketch,dlick twice on the 'white' tool on the tool bar. This should change the button to 'white rectangle'. This allows your to create a select and erase a part of the canvas by drawing a rectangle over it. Change the opacity, shown as 'A : 255' to 'A : 250' by click & dragging. Then use the 'white rectangle' tool and select the entire canvas. Because the opacity has been lowered slightly, your sketch should be a little lighter. This helps when you are outlining, because you are able to see the lineart better, while also being able to see the rough sketch in order to finish the lineart.
|
|
|
|
|
Tittri
\ (◡) /
|
|
02-21-2007, 06:44 PM
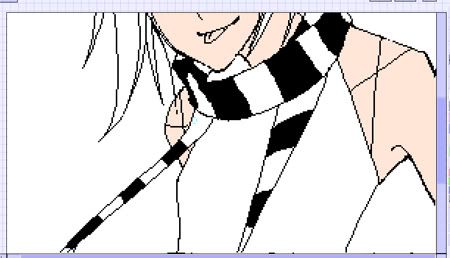
Starting the Lineart
Revert back to the 'solid' tool. Choose black as the color then 1 px for size. At the bottom of the tool bar, it should say 'layer BG'. Click on that and it should switch to 'layer FG'. This changes the layer that you are working on. Working on different layers gives you some advantages. These advantages include being able to erase layer FG if you mess up, without effecting anything on layer BG.
Using the black solid lines, carefully being lining your sketch. Remember to keep it neat. variations in line thickness also may help the picture look better. Do not line the hair, if your hands are shaky. This is because the hair lines may not come out clean on the first stroke, and you may need to erase some parts of it. Even though there is a 'undo' tool, it's limited. In order to line the hair, revert back to 'layer BG'. Line the hair on the first layer right over the sketch. It's okay if you mess up on this layer, but try to keep the erasing to a minimum, since the sketch will be erased too. Although this seems like a hassle, it's very helpful if you have very unstable hands and you're afraid you may mess up whatever lineart you have done for the rest of the picture while lining the hair.
**Remember to do a clean linework. This improves the quality of the final image
Lineart may be the hardest, most tedius and most grueling part of the process. But be patient and work at it diligently. It will pay off.
After you're satisfied with the hair, switch back to 'layer FG' and finish the rest of the lineart. After you're done, click on the tool that says 'normal' twice. It should now say 'mask'. The mask tool allows you to edit you picture without affecting the selected color selected and shown in the small rectangle on the button. To change this color, select the color, and right click on the button. Make sure you've selected black, then go back to 'layer BG', then erase the sketch lines.
Then switch back to layer FG. Click on the 'copy' tool twice. It should change to 'Layer Unify'. Select the entire canvas, and all the lineart should now be on layer FG now.
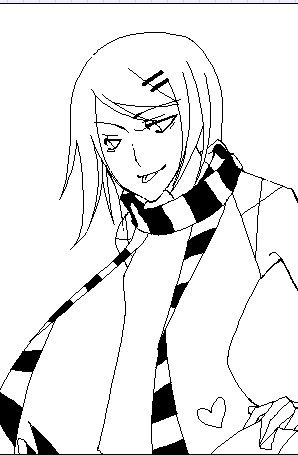
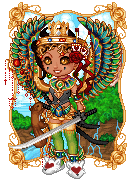
**The final lineart. Clean and nice :D
|
|
|
|
|
Tittri
\ (◡) /
|
|
02-21-2007, 06:49 PM
Coloring
Once you've finished your lineart and is satisfied with it, you are ready to color.
* Make sure your lineart is all on Layer FG
* Then make sure you are on Layer BG.
Usually, I start out with the skin. choose a base skin color down first. Clean it up so the colors aren't sticking out of the lineart.
Then, click on the 'mask' tool twice to switch to the 'remask' tool again. Select the base color you put down for the skin, then right click on the 'remask' tool. Then select a darker color to shade the skin, switch to the 'solid' tool again then color away. The remasking tool allows you to change the selected color, and the selected color only.
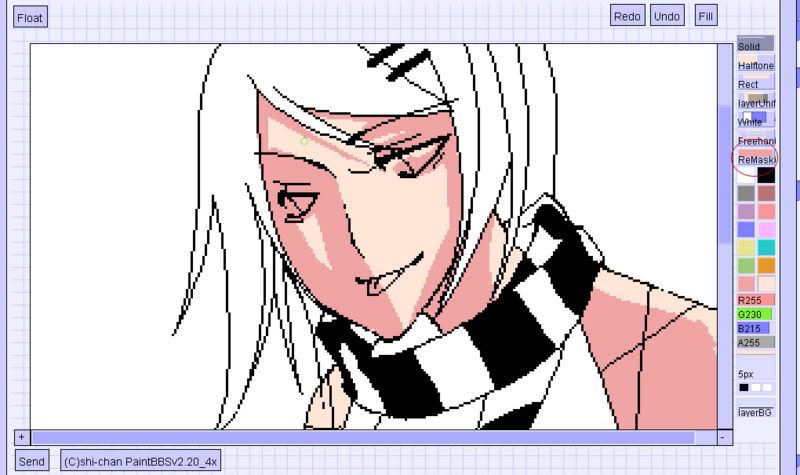
Once you are satisfied with the coloring for the skin, make sure that there are no stray marks. Then switch back to Layer FG and layer unify. This gives you a little more freedom when you color a different part of the picture since you don't have to worry about messing up the skin.
Switch back to Layer BG and use the same technique to color a different part of the picture, such as the hair. Once you're done, layer unify, and rinse, lather, repeat.
Once you are finished coloring the entire picture, layer uify the picture onto Layer FG. On layer BG, scribble down a background, and you're finished with your oekaki!
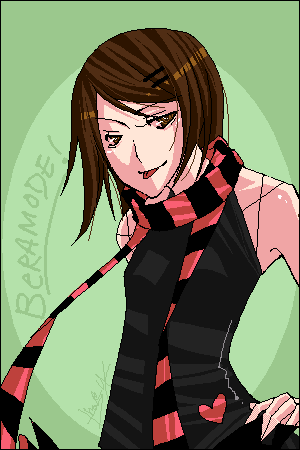
Finished Oekaki!!
I hope this tutorial was somewhat helpful :D feel free to ask questions!
|
|
|
|
|
Tittri
\ (◡) /
|
|
02-21-2007, 07:27 PM
|
|
|
|
|
Yumehayla
(^._.^)ノ
|
|
02-21-2007, 07:48 PM
whee paintchat xD!
but I'm too lazy to go paintchat anymore xDD
|
|
|
|
|
Lilithia
(◎_◎;)
|
|
02-21-2007, 10:19 PM
It made a lot of sense, although I cannot draw. XD
|
|
|
|
|
Wood Sorrel
ʘ‿ʘ
n/a
|
|
02-22-2007, 04:08 AM
Now if I only had a tablet...!
|
|
|
|
|
Tittri
\ (◡) /
|
|
02-22-2007, 04:44 AM
Oekaki's great because you really DONT need a tablet : D No pressure sensitivity needed! I love oekakiing with my mouse : D All you need is a little bit of endurance : )
|
|
|
|
|
shosho
(。⌒∇⌒)&...
|
|
03-10-2007, 04:16 PM
Oekaki's (paintbbs <3) is definitely one of my favorite "tools" for art *3* These tutorials are awesome, Ana! Thanks a lot for showing them! And my goodness.. your lines are CRISP! >3<
|
|
|
|
| Currently Active Users Viewing This Thread: 1 (0 members and 1 guests) |
|
|
|